Tuesday, June 5, 2012

Porterhouse Steak on the Grill

Who doesn't like steak?? We love it!! And my neighbor Harold grilled up a few for our monthly get-together. Steak of choice.....big, fat, thick and beautifully marbled Porterhouse. All I can say is that we were in steak Nirvana. Take a look for yourselves....


On the grill with a simple dry rub.

These four 3/4 inch Porterhouse steaks took up the whole grill space. And when we put each one on the plate, there wasn't a whole lot of room for anything else. That dilemma really caused me to suffer.......NOT!!!!

The Master of Disaster himself, Harold Fellows, retired USN.

Talk about "melt in your mouth" tender. And of course we had our variety of sides to go along with the steaks such as red potato salad, barbecue beans, Spanish Rice, BBQ'd eggplant, and hot wings. We also had a little dessert..... carrot and red velvet cupcakes.

Great company, food, and weather....another super day on Guam.

Until next time....

Sunday, June 3, 2012

Guacamole Goes with BBQ....Right??


BBQing is more than just cooked meat, seafood and veggies. We have to pump it up with some fabulous sides. And one of those sides that is always a hit is Guacamole. 

Guacamole is one of those items that can be used in a number of ways. Use it as a condiment, a dip, a main side, it goes good with just about anything.

Here is my recipe for a sure fire, tasty treat....

Guacamole:
  • 1 large avocado
  • 8 cherry tomatoes cut into quarters
  • 1 cup of cut, loose cilantro
  • Juice of one calamansi lemon (you can use lime but the flavor will be different)
  • Salt to taste
  • Dash (small pinch) of sugar (really helps blend the flavors) key ingredient

1.  Cut up the avocado and mash and stir all the ingredients together but still leaving it a little chunky;

2.  Let it all sit for at least 15 minutes so the flavors can blend with each other.

There are many recipe variations for guacamole but you'll notice that my recipe is very simple and basic. I feel that sometimes simple is better.

Serve with corn tortilla chips. Fresh, home-made chips are the best.

Home-made Corn Tortilla Chips:

I like to make my corn tortillas fresh but store bought is fine.

1.  Cut the tortilla into 8 pieces;

2.  Pour Corn Oil into a pan about 1/8th inch deep and heat to medium/high;

3.  Sprinkle salt into the oil. This is a key to perfectly salted chips. Mix the salt up in the oil. The amount will come with experience. Fry up one tortilla chip for a taste test (best part of the job) and adjust as necessary. You will get the hang of it with time;

4.  Start dropping your tortilla pieces into the oil. If turning by hand, once your are done dropping in the tortilla pieces, you can start turn over the first ones and so on;

5.  Once you are done turning all the pieces, you can take them out. Drain the tortilla pieces before placing them in a colander for cooling.

6.  Taste the chips. Salt to taste just in case there was not enough salt in the oil. Next time you can always add more salt to the oil.

Practice makes perfect. You'll be a pro before you know it.

There you have it....fresh guacamole and corn tortilla chips. Nothing like it to activate those taste buds. And just a reminder while chowing on this, don't stray too far from the cooler....

Until next time....

Sunday, May 27, 2012

Smoking Salt


Smoked Kosher salt (lightly smoked)

You always hear and read about smoked salts and what they bring to the table. Well after much reading on the subject I decided that I would give it a try. After all, I was just as curious as the next person.

My plan was to just smoke the salt lightly and experience the flavor. This would take about 4 hours because that was all I had time for on this particular day. I would later do an 8-hr smoke and taste the difference. Anyway here are the pics of what I did...

My smoker set up. It may be ugly but I love it!! You can see the tray of salt up top. I enclose the front with a hanging sheet metal when I smoke.

Here is the salt after about 4 hours.

A closer look of the results.

You can see the difference between the before and after.

All in all I liked the results. And I have been using this for seasoning on various dishes such as egg scrambles, grilled meats, and stir fries to name a few. You can really taste the subtle smokey flavor which is the effect that I wanted.

As I said next time will be an 8-hr smoke just to taste the difference. 


Until next time....

Friday, May 25, 2012

Grilled Ouzo Shrimp

BBQ'd Ouzo Shrimp (without the Ouzo)

I was going through some of my grilling magazines one day and came across this great looking grilled shrimp recipe in Cuisine at Home magazine, issue #75, June 2009. What a great issue and fantastic recipe. I just had to try this recipe out. We did and it was totally fantastic!!!

Here is the recipe:
  • 1/2 cup extra-virgin olive oil
  • 1/2 cup ouzo (Greek liqueur) or anise liqueur
  • 1/4 cup honey
  • 1/4 cup fresh lemon juice (got to be fresh)
  • 1/4 cup minced garlic
  • 2 tsp red pepper flakes
  • 2 tsp chopped fresh thyme
  • 2 lb. jumbo shrimp, peeled and deveined
  • Grape tomatoes
Note: I did not use the Ouzo because I couldn't find any. I also added in a couple of fresh hot peppers for a little extra kick.

My directions:

In a blender I made a pesto by adding all the ingredients, except the shrimp and tomatoes, and blending them together for about 30 seconds;

Then I marinated the shrimp in this for about 6 hours in the refer;

Skewered the shrimp with a grape tomato in between both ends of the shrimp as shown in the picture;

BBQ'd each side, over high heat, for a minute to a minute and a half while brushing the shrimp with the marinade at the same time;

BBQ'd until the tails were a little blackened for effect.

Served with white rice and finadene

Lemon Finadene

The flavor was unbelievable. The shrimp was moist and just melted in your mouth. The tomato was caramelized and sweet and the finadene just added that extra pop to the taste buds. It was one of those, "Suck on it for a while without biting it" kind of goodness. You know what I am talking about. We totally loved this recipe.

So if you ever get some grill time, try this out. I know you won't regret it!!!! You will need to buy a lot of shrimp because you just can't seem to stop eating this.

Until next time....

Wednesday, May 23, 2012

Smoked Meat....Guam Style

Smoked Meat....Guam Style

Well folks, it's been a while since I have posted. Been so busy planting my veggies in the yard (2 acres) and everything else that goes with that. Very time consuming. But we gotta eat so I have a lot of BBQ and other cooking posts that I need to catch up on. So don't forget to pay a visit to my other food blog, Guam Firehouse Cook.

I love smoking meat. Whether it is beef, pork, chicken or fish, I just love the taste. I use my old homemade open pit for most of my smoking needs. The openness flavors the meat with a mellow, smokey flavor. I don't like a taste where the smoke overpowers the meat.

I just smoked some beef roasts. I cut them up into 1 inch wide by about 8 inch long strips. The thickness was about 3/4 of an inch. Then I brine this meat overnight in the following mix:

  • 1/2 cup Kosher salt;
  • 2 cups brown sugar
  • 3 tbsp Mortons Tenderquick Home Meat Cure
  • 3 tbsp minced fresh Ginger
  • 1/2 cup of soy sauce
  • 4 quarts of water.

You should make sure that you adjust the saltiness to your liking.

I then fire up the smoker using one week old 6 to 8 inch logs providing for indirect heat. The one week old logs are not dried out yet so they provide enough smoke due to their moisture content.

Here are a few pictures of the setup that I use:

Here is my pit. You can see the meat hanging. The suspended grill is to catch anything that may fall off the hooks. When I smoke I close up the front with another piece of sheet metal.

Here is my fire. You can see that it is offset to the left of the hanging meat for indirect heat. The heat is keep at around 225 - 250 degrees F. That's close enough for government work!!

I'd say, after about 8 hours of smoking, this meat is done. Of course I have to test the tenderness by tearing off a piece.  But if you can tear a piece off you know it's done.

I fashioned some thick, stainless wire for a skewer. I skewer all the small pieces that I trimmed off onto this. Works just great.

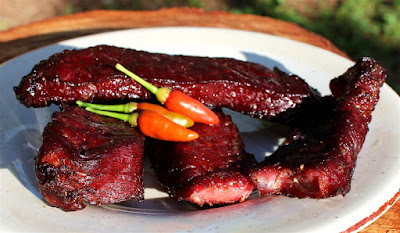
So, as I mentioned, I smoked this batch for about 8 hours, adding more wood when needed. As the cover photo shows, and here it is again, this meat is super tender and moist and loaded with mouth watering flavor. 


Better have some hot pepper and ice cold brews to totally enjoy this.

Until next time....

Wednesday, March 28, 2012

Grilling Eggplant- Guam Style


We love to BBQ our veggies on Guam. As a matter of fact we love to BBQ just about anything. But one of our favorites dishes is BBQ'd eggplant soaked in coconut milk mixed with lemon finadene'. Talk about something that makes your taste buds explode!! You just have to try it out for yourself.

But there is an art to BBQing the eggplant. You don't just build a fire and slap any old eggplant on the grill. There are a few important things to remember. So here are a few tips....

First you need to pick the right type of eggplant to BBQ/grill. Pick eggplants that are about 6-8 inches long and are nice and plump. They will need a strong stem on them also. You don't want to use the long, slender type of eggplant. The reason why is that you want a lot of "meat" and that is what a plump eggplant provides. The long, slender eggplants just don't have enough meat on them for a good bite. But if that is all that is available, then by all means use what you got. 

You want a young eggplant. The skin should be very shiny. The younger ones just taste better as in most things.

These eggplants are just about right. I would have liked them slightly younger, but they still had a sheen to them.

The strong stem is what you are going to use to turn the eggplant from side to side when you are BBQing them. The stem will also act as the "handle" for you to use when removing it from the finished dish and onto your plate. So when cooking the eggplant you definitely try to protect the stem from burning up.

Make sure that you puncture your eggplants. This allows for heat to penetrate quickly and steam to escape. It just provides for a more efficient grill.

I use a small knife but many use a fork to puncture the eggplants.

Now your fire is another item of concern. Regardless of the type of pit, protect the stems from the direct flames. So with a kettle grill, just build yourself a 2-zone fire, hot and cold. This way the eggplants will be grilled in the hot zones with the stems over the cold zone and the edge of the kettle if necessary.

And build your fire hot. This will cook the eggplants faster.

Here is a picture of the fire in a kettle grill...

2-zone fire.

Placement of eggplants on the grill with the stems protected from the direct flames.

Do not use a fork or tongs if you can. Using any typical BBQ instruments to turn the eggplants can result in the eggplant being damaged and the skin and meat being torn. You want the eggplant intact as much as possible so turn them using the stem. Of course this means that you will need to be wearing gloves to protect your hands from the heat, but that is the price you pay for having a nice looking eggplant.


You can also grill the eggplant directly on the coals with the stems off of the coals protected.

Here are a couple of eggplants being grilled directly on the coals. This is my preferred method as, in my opinion, the grilling is more complete and a whole lot faster.

When you are done grilling/BBQing your eggplants, they should look somewhat like these...

Finished eggplants with the skin blackened and the stems pretty much intact.

Of course the rest of the prep for the finished dish can be viewed here.

Here is a picture of the completed dish...

BBQ'd eggplant in coconut milk and lemon finadene'.

Of course there are many different recipes and ways to make this dish. As in anything, everyone has "their own way". But I brought out some tips just to help out.

Hope you enjoy making one of Guam's wonderful dishes.

Until next time....

Saturday, March 24, 2012

Pork and Chicken BBQ- Bare Essentials


Sometimes you just get together and BBQ at the spur of the moment. Unplanned as some would say. But do you ever notice those are some of the best times? And that is exactly what we did on this day.

Our good friends Rita and Peter Carbullido invited us to their home for a little impromptu BBQ. Peter told me he had dry rubbed some pork belly, pork chops and pork country ribs. PORKALICIOUS is what we are talking about!! My favorite meat. Our contribution would be a couple of dry rubbed chickens and of course some finadene' denanche' (hot pepper paste). So I went over looking forward to some good eats!! 

When I arrived, Pete, who has quite an open BBQ pit setup in his backyard patio, was under a tree in the empty land across the street with a few blocks and a grill with the fire already going. That's what I like.....bare essentials. Here is a photo of the elaborate BBQ set up!!


Prep table, a few chairs, some concrete blocks and a grill. Now who wouldn't love that. But the most important ingredients to a great time are great company and BBQ. We had it all!!

Enough with the speech. Don't we always say that pictures are worth a thousand words. Well here are a couple thousand worth.....

Maple rubbed chicken.

Super simple but efficient set up.

Chicken is looking awesome!!

Pete is slapping down the pork rubbed with salt and pepper...

Master griller in action!!

Slicing the chicken because they are hungry. Pete's nephew... a protege in training??

Nope, he is an eater. Must have sampled about 5 or 6 times.

Now he is getting serious!!

Pete's youngest son, Brandon, is polishing off his plate.

Our gals, Lupe and Rita are really enjoying their food. Looks like Lupe is either yawning, sneezing or is enjoying her hot peppers. Hehehehe!!!

To round out the menu, we had a delicious macaroni salad, turkey stuffing and Spanish rice with finadene' denanche' on the side.  Of course we had our share of refreshments. 

We were joined by Rita's parents, Mr and Mrs Blas and another nephew. We had a great time and we were blessed with great weather. 

Just another Guam day.

Until next time....

Monday, March 19, 2012

Guam Salmon Salad!!!

Need a new side dish for a fish-themed BBQ. Try out Guam Salmon Salad. Talk about an abundance of flavors....


Check out the recipe on the Guam Firehouse Cook blog.


Hope you enjoy it!!!

Until next time....

Wednesday, March 14, 2012

Guam Chicken Chalakiles

If you like chicken and want to try something different, you definitely have got to try Chicken Chalakiles. A very popular dish here on Guam, this basically is a stew made with chicken, toasted ground rice, coconut milk, and colored with achote/achuete or annatto seeds or powder. It is a great dish and one that needs to be on your "must try" list!!


Chicken Chalakiles

So I had some for lunch the other day over white Jasmine rice. I was told that I needed a bigger plate. What do you think? I didn't think so. I just filled this plate up 2 more times....

Anyway, here is the recipe that I used...

Chicken Chalakiles 

Ingredients:
  • 1 whole chicken cut into small tablespoon sized pieces 
  • ½ medium onion, diced 
  • 3 cloves of garlic, minced 
  • 2 tbsp of oil 
  • Water to cover chicken in pot 
  • ½ cup of cream of rice (approximate) 
  • Achote/Annatto seeds for coloring (I used one 1/3 oz. packet of Mama Sita’s powdered achuete) 
  • 1 can, 15 oz., of coconut milk 
  • 10 fresh hot peppers, crushed (optional but we love hot pepper) 
  • Salt to taste… 
Directions:
  • In pot over medium-high heat, sauté onions and garlic in oil; 
  • Add the chicken and brown; 
  • Add water just to cover chicken by 1 to 2 inches; 
  • Bring to boil and reduce heat to low and until chicken is cooked (about 20 minutes); 
  • After about 15 minutes add the achote (powdered), stirring until it all has dissolved; 
  • Add the cream of rice until you have the consistency that you like. You don’t want it so thick that it will not readily flow onto and over your plate; 
  • Add the hot peppers. These are optional but add greatly to the flavor. Reduce amount to your taste; 
  • Then add the can of coconut milk and stir; 
  • Salt to taste. 
Enjoy over white rice. We use Jasmine in our home. Not as sticky and has a great flavor.

Give this dish a try. You will love it....I'm sure!!!

Until next time....

Wednesday, March 7, 2012

BBQ'd Grouper (Gadao) and Eggplant


My wife, Lupe, wanted me to BBQ some Gadao, which is the Chamorro term for grouper. Lupe loves BBQ'd grouper. I decided to make full use of the fire so I added BBQ'd eggplant, and hot plate grilled onions and cowboy fries (potato wedges) just to round out the meal.

Enough said!! Here are the pics....

Got these pan sized grouper all laid out. I just seasoned with sea salt and a little garlic powder.

Closeup of the grouper. These are just about done. BBQ'd grouper taste fantastic. Especially with the flavor that the smoke imparts on them.

I placed the eggplants directly on the coals to BBQ them. Notice I try to keep the stems from burning by protecting them with wood or raising up off the coals. Need the stems for "handles" later on.

Here is the finished eggplant. To prepare this dish you can view the process on one of my previous posts here.

Built up the fire, placed the hot plate and caramelized the onions in butter. Seasoned with a little fresh ground black pepper.

Cut the potato into eight pieces, seasoned with sea salt and black pepper and grilled on the hot plate with the remaining butter.

Here is the finished eggplant dish in the coconut milk finadenne' (Chamorro hot dipping sauce). You can see how we utilized the natural "handles" of the eggplants.

BBQ'd grouper served and already being attacked!! Lupe is one fast gal when it comes to her BBQ'd fish. Watch your hands around her!!! 

Lupe's plate. You can see her lifting up a hot pepper. Just about every bite will include a hot pepper. Lupe can take plenty of heat. I gave her a Ghost pepper and she took it down like a popsicle. But she did say it was hot!!!

My eggplant with that coconut milk/lemon finadenne'. You can see all the hot peppers. They are a must eat with this dish.

To top off our meal, we also had the staple of Guam, white rice.

Needless to say, we thoroughly enjoyed our dinner. Finished up by 5:30 pm and went out to the garden to work it off.

Another great day on Guam!!

Until next time....